Sweep
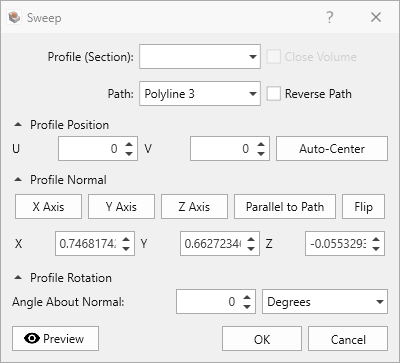
The Sweep tool is a special case of using the Extrude option. Sweep extrudes a geometry entity along a selected polyline. This is useful for creating curved solid volumes, such as a curved tunnel. The polyline does not need to be linear. To do this:
- Select the Geometry
 workflow tab.
 - Select one polyline or planar surface to apply the sweep operation and one polyline to define the sweep path.
- Select Geometry > Extrude/Sweep/Loft Tools > Sweep

- A dialog should appear. The Profile (Section) is the geometry to be copied along the Path polyline. You can edit the Profile (Section) and Path using the drop-down menu.

- Define the Profile Position. The Profile Position is the point on the profile aligned on the path. By default, it is the centroid of the profile. You can shift the profile position by entering a U and V value corresponding to a shift in the vertical and horizontal direction away from the centre.
- Define the Profile Normal. The Profile Normal is used to align the profile with the path. It can be defined as the x-, y-, or z-axis, parallel to the path or as an XYZ coordinate.
- Define the Profile Rotation. The profile will be rotated about its normal axis by the entered angle in degrees or radians.
- Similar to the Extrude option you can choose to use the Close Volume option to create a solid volume from the sweep geometry. You can also use the Reverse Path option to reverse the direction of the sweep.
- You can also use the Preview
 option to view your translated entities before you accept the changes by pressing OK.