Add Composite Liners
A Composite Liner is added to a RS2 model in exactly the same way that a regular (single layer) liner is added: using the Add Liner option.
To add a Composite Liner:
- When you select the Add Liner option, select the Composite Liner check box in the dialog which appears before you add the liner to the model. You can also select the Composite Property type.
- Add the liner to the desired boundaries, as described in the Add Liner topic.
- When the liner has been added, RS2 will treat this as a Composite Liner.
NOTE: if you do not initially define a liner as composite when the liner is added to the model, you can always Assign composite liner properties to a liner at any time, using the Assign Composite Liners option.
Automatic Liner Removal
Please check the status of the Automatic Liner Removal option. When this option is ON, composite liners will be automatically removed (just like regular liners) when the material on both sides is excavated, regardless of the staging in the Define Composite Properties dialog or the Add Liners dialog. See more details in the topic.
Joint in Composite Liners
Regardless of the Joint Placement (between the rock/soil and the first liner layer, or between any two consecutive layer of the composite liner), the joint layer must attach a liner AND a soil, which otherwise will be automatically removed.
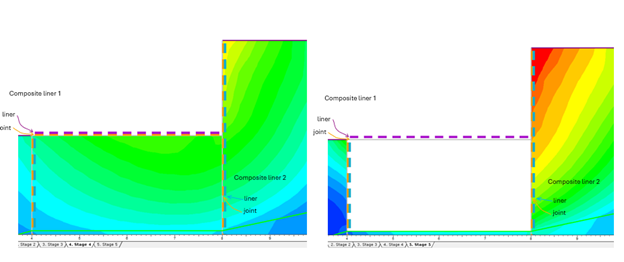
Example
The example model is opened in RS2 Interpret, where the composite expanded layers can be displayed (see Figure 1). Compare the composite liner before (left) and after excavation (right):
- the joint in composite liner 1 is only attached to a liner, with no soil material, so it is automatically removed.
- the joint in composite liner 2 remains attached to both a liner and a soil material on one side, so it stays in place.