Advanced Liner Selection
Advanced Selection is a feature to address difficulties in tracking down from the visibility tree the liner result entities that are of interest; furthermore, assist in efficient data retrieval. Advanced Selection grid for liner and interface can be accessed by selecting any Liner Result or Interface Result entity and unfolding the Advanced Selection option under Properties pane. This feature is also accessible from Interpret > Advanced Liner Selection or Advanced Joint/Interface Selection.
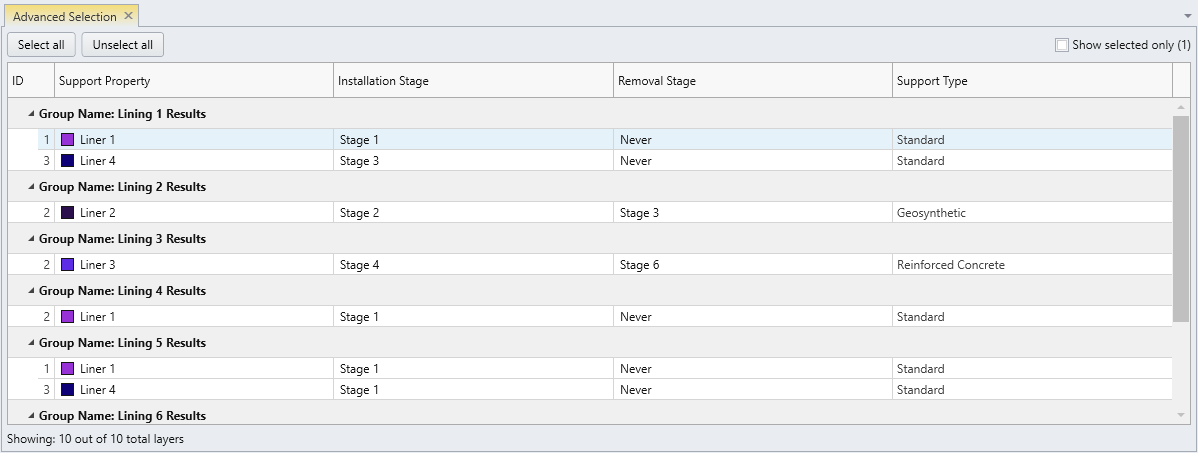
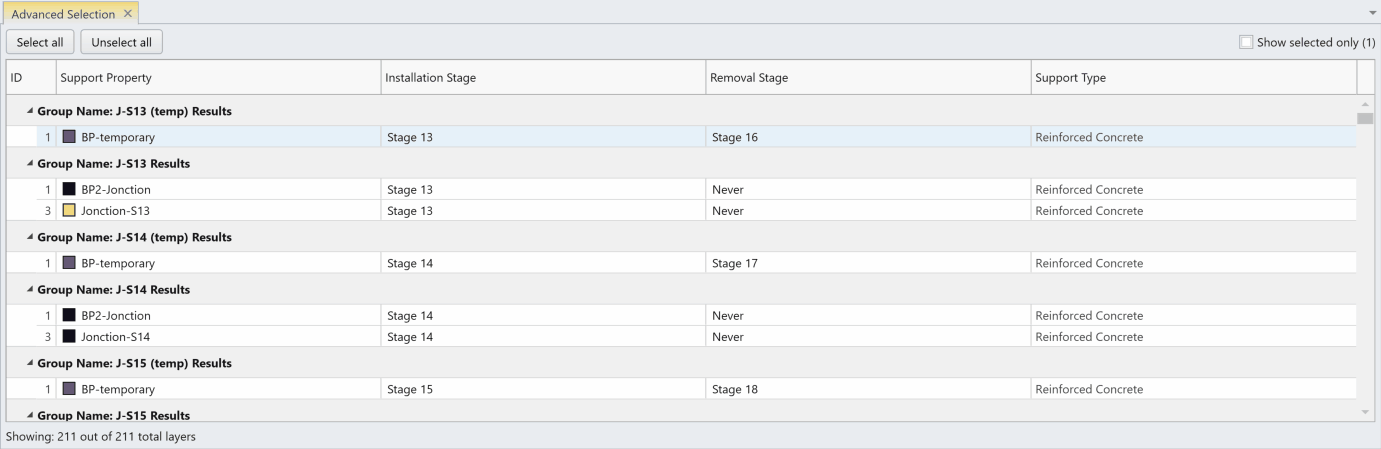
The Advanced Selection tab appears with a table that shows a list of all liner entities in the model with the installation/removal stage and the type of liner, the name of assigned material properties, installation and removal stage, and liner type. With these categories, users can find the liner result entities through sorting/filtering the liner result entities in forms of manual selection or conditional statements.
Sorting, Grouping, Choosing, and Fitting
Advanced Selection table can be edited in many ways. By right clicking on a column users can sort, group, hide/unhide columns, and fit the columns by the length of text. Sorting can be used to sort by ascending or descending order and also be cleared by again right clicking a selecting Clear Sorting.
Grouping refers to categorization of liner entities within the table generated under Advanced Selection tab. It can be done by Group By This Column function or drag-and-dropping the column after enabling Show Group Panel. To remove a grouping click Show Panel and remove all columns. The group panel can be hidden by right clicking and selecting Hide Group Panel.
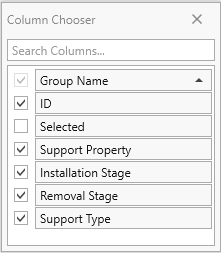
Certain columns can be hidden through the Column Chooser. Right click on a column and select Show Column Chooser. A Column Chooser dialog box will appear. To hide columns, uncheck the tick boxes to the left of the column items.
The spacing of the columns can be controlled manually by hovering of the edge of a column. By right clicking on a column users can choose to Best Fit a certain column or to Best Fit (all columns)
Filter
A filter icon ![]() appears from hovering over a column title. Clicking the icon provides users basic filtering conditions. There are two basic forms of filter: Filter Values and Filter Rules. To create more advanced filtering conditions the Filter Editor can be used. Previously applied filters can also be found from Filter History.
appears from hovering over a column title. Clicking the icon provides users basic filtering conditions. There are two basic forms of filter: Filter Values and Filter Rules. To create more advanced filtering conditions the Filter Editor can be used. Previously applied filters can also be found from Filter History.
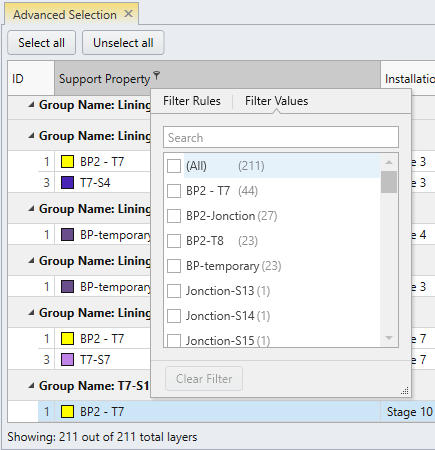
FILTER VALUES
Filter Values allows users to select specific liner result entities paired with the data entered under that column. It can be done by typing in the search box or scrolling from the ordered list. To clear the filter, click clear filter button  .
.
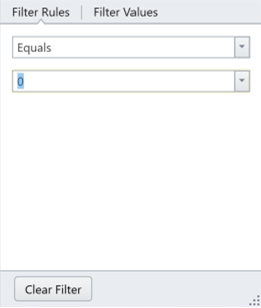
FILTER RULES
Filter Rules option has a range of operators to choose from depending on the type of data (numerical or non-numerical) stored under the chosen column. Filtering is applied that satisfies a rule defined by an operator and operand.
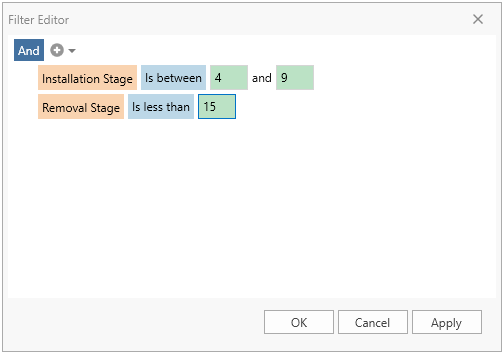
FILTER EDITOR
To open the Filter Editor, right click on a column and select the Filter Editor icon ![]() . With respect to the selected Boolean expression, wherein And is set as a default, different forms of conditions can be added to filter the liner result entities. Conditions can be added by clicking the drop down beside the
. With respect to the selected Boolean expression, wherein And is set as a default, different forms of conditions can be added to filter the liner result entities. Conditions can be added by clicking the drop down beside the ![]() button. It provides options to Add Condition, Add Group, or Add Custom Expression. The simplest form of condition is formed by a line of conditional statement, which can be generated by Add Condition or simply clicking the
button. It provides options to Add Condition, Add Group, or Add Custom Expression. The simplest form of condition is formed by a line of conditional statement, which can be generated by Add Condition or simply clicking the ![]() button. To define the Condition:
button. To define the Condition:
- Select the Column Name (e.g., Installation Stage) to query
- Select the Operator (e.g., Is less than)
- Select the Operand (e.g., 1)
Add Group function provides an option to form a group of several conditional statements satisfied by a Boolean expression.
Add Custom Expression function provides a more flexible option to generate a conditional statement, which allows to add mathematical functions and constants to the conditional statement. Clicking the Enter Expression box will navigate the user to Expression Editor dialog, where the user can type the equations or construct one from the tabs available.
Let us create an example to filter liners installed between stage 4 and stage 9 and removed before stage 15.
- Clear all filters such that only a And box is shown
- Beside the And box select the upside-down triangle, click on Add Condition
- Click the orange box and set the column to Installation Stage
- Click the blue box and set the operator to Is between
- Click the first green box and set the first constant to 4, set the second constant to 9
- Beside the And box select the upside-down triangle, click on Add Condition
- Click the orange box and set the column to Removal Stage
- Click the blue box and set the operator to Is less than
- Click the first green box and set the constant to 15
- Click the Apply button
FILTER HISTORY
To return to a previous executed filter condition, click on the Filter History button  . This will display any previously run filters and can be reselected by clicking on them.