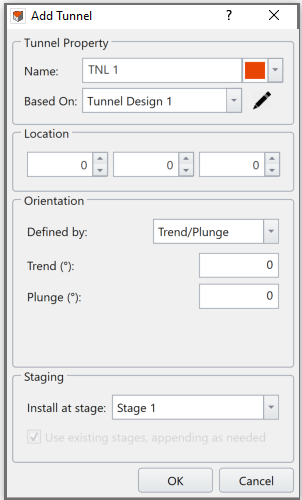
Add a Tunnel
You can Add a Tunnel to the model after it is defined in Tunnel Designer.
To Add a Tunnel:
- Make sure the tunnel is defined with Tunnel Designer option in the Tunnel menu.
- Select Add a Tunnel from the Tunnel menu. You will see the Add Tunnel dialog.
When the dialog is open, the tunnel can be previewed in the viewports. Refer to the preview to further modify the placement and orientation of the tunnel (as described in Step 2). - In this dialog:
- Define the Name and color of the tunnel.
- Select a tunnel design to be Based On.
Use the dropdown bar to choose a tunnel design from the list. If needed, click on the Edit icon to modify tunnel properties
- Specify the Location of the tunnel. The location is defined by the Reference Point of the tunnel. Modify the location coordinates here to adjust the tunnel placement in the model.
- Specify the tunnel Orientation with available methods:
- Vector - specify a vector with XYZ components. The normalized vector will be shown below in blue text.
- Trend/Plunge - specify a trend angle and a plunge angle. See the help page Sign Convention - Trend/Plunge for trend/plunge sign convention in RS3.
- In the Staging section, choose a stage to install the tunnel. The staging sequences specified in the Tunnel Designer will be applied.
- Click OK to apply.
