Lab Tests
Conducting laboratory tests on soil and rock samples are a common way to estimate material properties. Simple examples of lab tests include sieve test, moisture content test, chemical test etc.
Once you process raw lab tests and calculate the test results, these can be entered in RSLog on the Lab Tests page. Once lab test results are in RSLog, you can present this data on the borehole log.
To access this page: Go to the left-hand navigation menu and select Data Entry & Design → Lab. Tests. This page include the following tabs:
- Index Tests: covers the most common soil tests,
- Strength Tests: covers soil tests dealing with hydraulic and mechanical properties,
- Chemical Test: covers the most common chemical tests for soil samples,
- User-Defined: use this tab to add any other lab test to the list.
Data Entry
To enter lab test results, use one of the following options:
Manual Data Entry
To enter a lab test result manually:
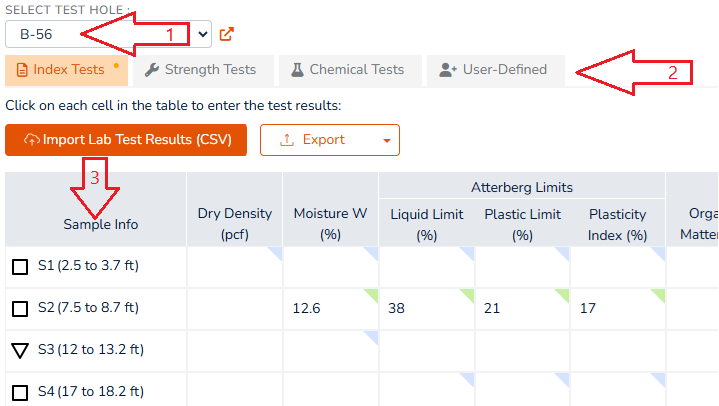
- Select the desired Test Hole from the drop down at the top-left of the page,
- Select one of the tabs for lab test category (Index, Strength, Chemical or User-Defined),
- List of samples of the selected test hole are shown in the first column of the table,
- Click a cell to enter the test result for a specific sample.
Importing a CSV File
No matter what software you use for processing the lab tests, you can summarize all the test results in a spreadsheet and export it to a CSV file. This CSV file can then be imported to RSLog (read about CSV import feature). Here is how to prepare your CSV file:
- No specific order of columns is necessary. However, we recommend starting with the first column being Sample Number, followed by other columns representing different lab tests,
- The number of lab test columns in your CSV file may vary depending on the tests you want to import,
- If you want to include test results for multiple boreholes in the same CSV file, please add a column to your file for Borehole Name.
- Click Import Lab Test Results (CSV) button above the table. This opens the CSV Import dialog box,
- Upload your CSV file and start mapping the columns,
- If your CSV file contains lab results for multiple boreholes, select the checkbox for "This CSV file contains data for multiple test holes"
- Once column mapping is completed, click Import button.
This will update the test results for all boreholes.
Importing Data Exchange Excel File
Please see the following section for using RSLog proprietary Microsoft Excel file for data exchange.
Lab Test Requisition
The purpose of this feature is to streamline data exchange between the engineering team and the lab. The following sections outline the proposed workflow:
Understanding Lab Test Progress Status
In order to keep track of progress of a lab test, RSLog uses the following progress statuses:
- Requested : indicates a lab test has been requested for this sample,
- In Progress : indicates the lab test is in progress,
- Reviewing : indicates the lab test is conducted and lab personnel are reviewing the calculations and the test results,
- Complete : indicates the lab test is complete and the test results are ready for use, and
- Canceled : indicates the lab test is canceled.
The lab test progress status is shown as a triangle at the top-right corner of the corresponding cell in the table.
Requesting a Lab Test For a Sample
With the new design of the Lab Tests page it is easy to indicate a lab test request:
- Select the desired test hole from the top-left of screen. This will load the list of samples in the table,
- Hover over the row corresponding to desired sample,
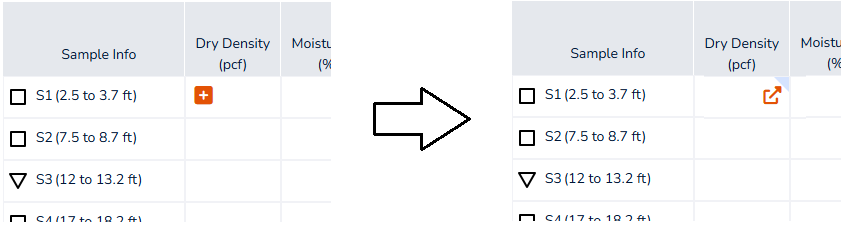
- Click the
 button. This leads to the following:
- it indicates the subject cell as Requested,
- in hovering over the subject cell a
 button appears on the right side of the cell (see below screenshot),
 - clicking the button opens a dialog for editing the lab test information.
- Continue requesting lab tests for other samples and boreholes, as required.
Editing Lab Test Information
Once a lab test is requested for a sample, a button is displayed when hovering over that cell. Clicking this button opens a new dialog that allows editing the lab test progress status, lab test result, and notes pertaining to the subject lab test.
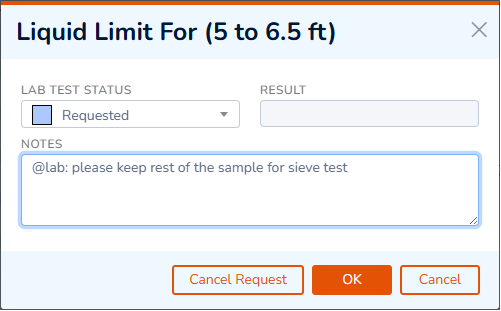
- Use the Lab Test Status dropdown to update the progress status of this lab test,
- To enter the Result, first set the Lab Test Status to Complete, then the Results textbox becomes available for data entry,
- To cancel a lab test, click Cancel Request button; This will simply set the Lab Test Status to Canceled. Please note that if the Lab Test Status is Complete, you cannot cancel the test.
Data Exchange With The Lab
RSLog has designed a data exchange solution to streamline communication between RSLog users and the lab personnel. This feature utilizes a proprietary Microsoft Excel file to send and receive the following data:

- List of Lab Test Categories: the Excel file contains a worksheet for each test category (i.e. Index Tests, Strength Tests, etc.),
- List of All Samples: the first columns in each worksheet (test category) contain borehole name, sample number and sample depth. Please note RSLog uses Sample Number to identify a sample when using this Data Exchange feature,
- Requesting a Lab Test on a Sample: if a test is requested on a sample, the cell background color will change to light blue in the Excel file,
- Notes: if a note is added to a lab test it will turn to a Microsoft Excel note, indicated as a small red triangle at the top-right corner of the cell (see an example in the screenshot above)
- Lab Test Status: use Microsoft Excel's custom styles to update the status of a cell. This can be accessed from Excel's Home tab → Styles section → open dropdown → Custom list. This is shown in the screenshot below.
- Test Results: lab personnel can use this Excel file to enter the test results.

RSLog User Sends Lab Test Requisition to the Lab
Once all necessary lab tests are marked and notes are added to certain tests, this data can be shared with the lab as follows:
- Click the Lab Data Exchange button (top-right of screen),
- Select Export Lab Data menu,
- This will download the Microsoft Excel file that was described in the previous section,
- Share this Excel file with the lab personnel.
Lab Technician Updates the Lab Test Results
As the lab tests progress, the lab personnel can update the test results and communicate latest data with RSLog users:
- Lab technician opens the Excel file exported by RSLog,
- Update test results, notes or test statuses as necessary,
- Save the file and share it with RSLog users.
RSLog User Imports the Latest Lab Test Results
When the lab technician updates the Excel file and shares it with RSLog user:
- Login to RSLog and navigate to the Lab Tests page,
- Click the Lab Data Exchange button (top-right of screen),
- Select Import Lab Data menu,
- Upload the Excel file,
- Latest lab test results, notes and statuses will be imported (any existing lab test results will be overwritten).
User-Defined Lab Tests
The User-Defined tab allows you to enter additional tests that are not covered within the scope of the Index, Strength or Chemical tests.
To add a User-Defined test to the list of lab tests:
- Go to User-Defined tab,
- Click Manage Tests button,
- A dialog will appear; Click + New button,
- Enter the Test Name and Description and click Save button,
- Click Close to close the dialog and go back to the User-Defined tab.
The new user-defined test will be added to the right end of the table in User-Defined tab.
Show Lab Test Results on the Log
All lab test results entered on Lab Test page can be displayed on the borehole log by linking a log column to that lab test. Please read more on this page.