CSV Import
Comma Separate Values is a common data exchange format that is widely supported by consumer, business, and scientific applications. Among its most common uses is moving tabular data between programs that natively operate on incompatible (often proprietary or undocumented) formats. Most tables in RSLog offer the CSV Import feature. Using this feature, instead of a line-by-line data entry you can import the entire dataset from a CSV file.
Each record (line) in the CSV file consists of one or more columns, separated by comma. Please note that RSLog assumes the first line of your CSV file contains column-headers:

Importing From a CSV File
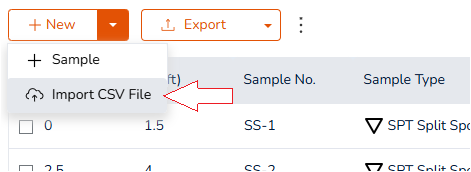
Most tables in RSLog allow you to import data from a CSV file (read more about working with tables). The CSV Import feature allows for 'filtering' and 'mapping' of the data during import. To start importing from a CSV file, click + New → Import CSV File menu from the toolbar at the top of the table.
This opens a new dialog. Start by clicking the Browse button and uploading the CSV file (see below). Please note that the first row in your CSV file must contain the column-headers; This is needed for mapping the CSV columns to RSLog data entry columns:
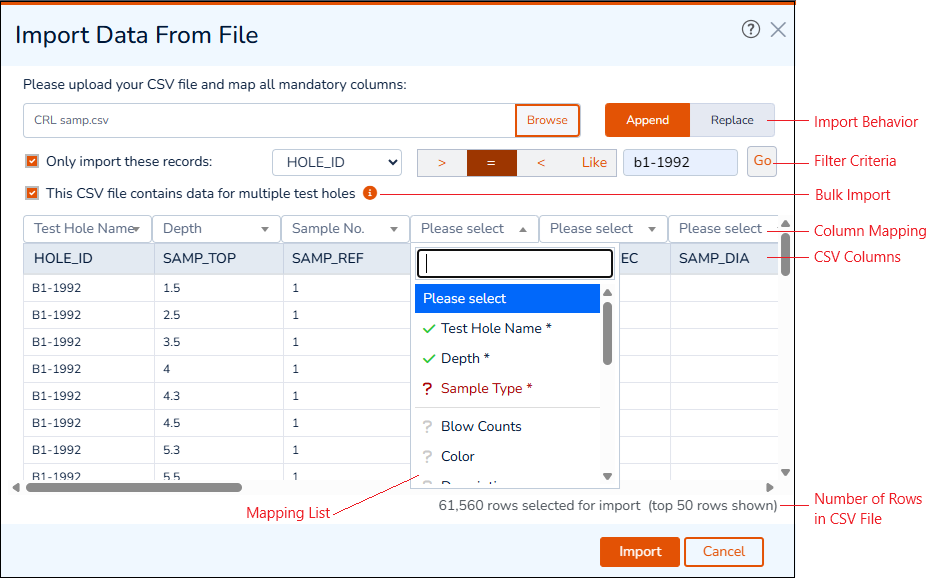
Once a CSV file is uploaded or the filter criteria is updated, the affected records will be shown in the preview table.
Import Behavior
The CSV import feature works in two different modes:
- Append: this option will add the CSV data to the end of the table (existing records in the table will be preserved), and
- Replace: this will replace the data in the table with the CSV data (i.e. all existing records in the table will be lost).
Filtering Data
If the CSV file contains some records that should be excluded from the import, use the filter criteria to narrow down the records. To do so:
- Select the Only import these records checkbox,
- Open the dropdown next to the checkbox and select a column to filter,
- Select a comparison operator:
- > used for comparing a number with your filter criteria; for example 'Depth > 2.7'
- = used for comparing a number or string with your filter criteria; for example 'Depth = 3.5' or 'Borehole = BH22-01'
- < used for comparing a number with your filter criteria; for example 'Depth < 12.8'
- Like used for comparing a string (text) with your filter criteria; For example a search for boreholes Like "BH22-" would return both "BH22-1" and "BH22-2"
- Click Go button. This will filter the records and updates the preview table.
Data Mapping (CSV Columns)
Your CSV file may contain several columns that you may or may be want to import to RSLog. Review the preview table and for those CSV columns that should be imported, open the dropdown and confirm the data they carry. For example, in the screenshot shown above, the following data mapping is shown:
- CSV column "HOLE_ID" is mapped to the RSLog column "Test Hole Name",
- CSV column "SAMP_TOP" is mapped to the RSLog column "Depth", and
- CSV column "SAMP_REF" is mapped to the RSLog column "Sample No".
The following sings in the mapping list indicate the status of each column:
- * : the column is mandatory and it should be mapped,
-
 : the column has been mapped,
 - ? : the mandatory column has not been mapped,
- ? : the optional column has not been mapped,
Once filtering and data mapping is completed, click Import button to initiate the process. RSLog saves your column mapping and automatically loads the same mapping next time you upload a CSV file.
Bulk Import
If your CSV file includes data for multiple boreholes, the following steps illustrate the most efficient way to import your data to RSLog:
1. Import the List of Boreholes
Once a new project is created, you can add boreholes manually (one by one). However, if you have the list of all boreholes in a CSV file, you can create all borehole with a single CSV import:
- From the left menu panel, under Data Entry & Design select the Test Holes menu. This takes you to the Test Holes page.
- From the toolbar at the top of the table, click + New → Import CSV File menu.
- In the dialog that appears, upload your CSV file and map the CSV columns as require.
- Click the Import button to create all boreholes.
2. Import Borehole Details
Borehole details may include list of samples, SPT results, stratigraphy, drill runs, etc. In a project with large number of boreholes, importing separate CSV files for every borehole is not practical. For bulk importing of borehole details:
- Edit one of the boreholes created in Step 1 above.
- Go to the desired tab (e.g. Samples tab).
- From the toolbar at the top of the table, click + New → Import CSV File menu.
- In the dialog that appears, upload your CSV file and map the CSV columns as required.
- Select import behavior: Append vs Replace.
- Click This CSV file contains data for multiple test holes checkbox.
- Select the column that carries borehole name and map it to Test Hole Name (see below).
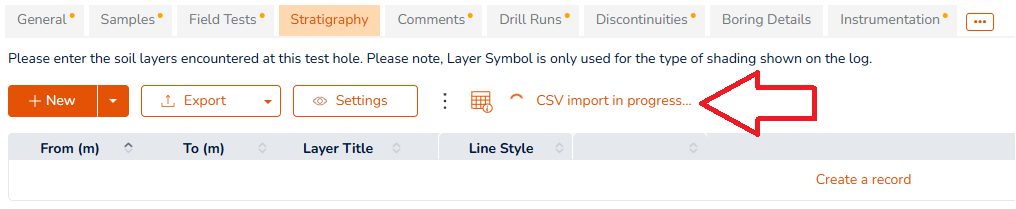
- Click the Import button to start the importing data. Please do not navigate to another page and do not close the browser as this may take up to several minutes.
Once a bulk import is initiated, you will see a spinner and status update at the top of the table:
Data Type Mismatch Error
The data imported from a CSV file contains the following data types:
- Numeric Fields (e.g. Depth of a field test, or Sample Recovery of a sample): numbers are typically imported smoothly.
- String (Text) Fields (e.g. Sample Description): a text column should be mapped to a RSLog column with string data type, otherwise it will be lost during the import. For example, "Dense" cannot be imported into the Depth column.
- List Items (e.g. Sample Type): for list items such as sample type, log symbol, and drill method the text should exactly match your RSLog Settings page. The values given in the CSV file for List Items should match the Term or Symbol column on the Rock Classification, Soil Classification and Field Investigation tabs.
For example, assume you have "Auger Sample" as a sample type in your RSLog account (i.e. on the Settings page) with its Symbol defined as "AS". In that case to indicate this type of sample in your CSV file, you should either use "Auger Sample" or "AS".