Create a Template
Below is an overview of the major functionalities and steps to use the Template Creation tool. This tool allows you to create and match templates to each page of your file. The template creation tool is accessed through each file in the OCR table. Click the Create or Edit Templates icon button button to reach this page. As well, clicking the View File icon button will take you to the same page, but you can view a template instead of editing it.
The template creation tool has two main sections: the left sidebar and the PDF viewer. The left sidebar displays actionable steps to complete the template creation process.
The PDF viewer allows you to visualize and edit the log extraction template right on the PDF. Below includes a list of PDF viewer features:
- The help popup in the top right corner of the viewer.
- The navigation button in the top left corner of the viewer. This opens the thumbnail view on the right side of the page where you can see all the pages in the file. An icon on each thumbnail indicates if the page has been assigned a template or is missing a template. Clicking a page moves to that page.
- The legend at the top of the viewer.
- The bottom toolbar that includes: arrows to move to different pages, a zoom drag bar, a button to expand the PDF to the entire page, and the current page label.
Step 1: Confirm Log Bounding Lines
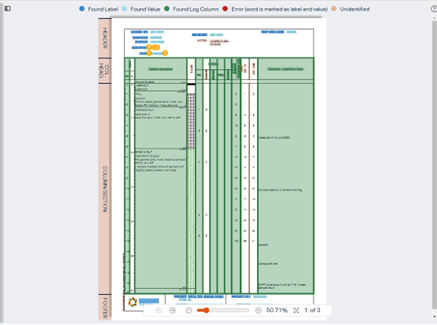
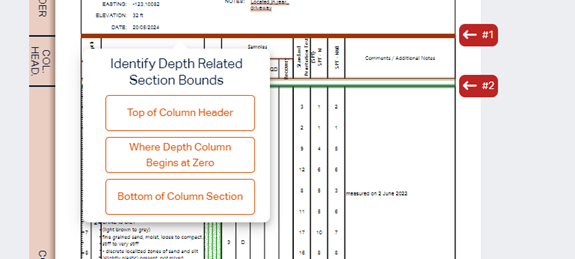
The first step is to confirm the bounding log lines of your PDF. This increases the quality of our guesses and increases usability. The three lines indicate the top of the column header, the point at which depth starts at zero, and the bottom of the column section. These lines form the following sections that are labelled on the PDF: the header, column header, column section, and footer. These sections indicate the location of the data that can be extracted: the header and footer extracts label/value data and the column section extracts depth-dependent log data.
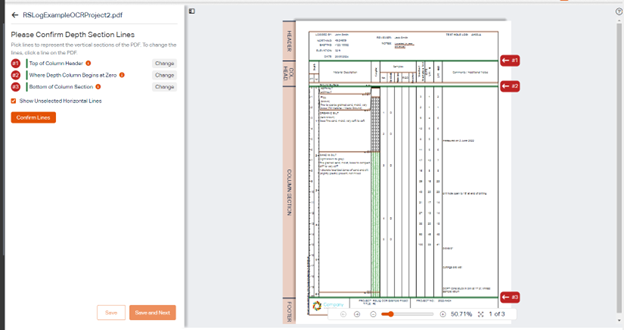
To verify the line guesses either 1) Hover over the lines on the PDF or 2) Hover over the line labels on the left sidebar. The numbers help indicate which line is which. To change a line, simply click a new line on the PDF that you want to assign. The selected lines are highlighted in green, and the unselected lines are light orange. When you are finished with the line selection click Confirm Lines.
Step 2: Choose to Create or Apply a Template
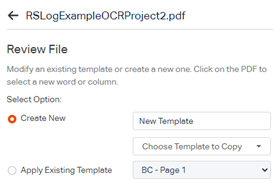
In the template creation tool, you have the option to create a new template or apply a template. Select the option you want with the radio buttons in the left sidebar.
Apply a Template
Applying a template is only applicable when there are minor, inconsistent changes to the current page that otherwise matches an existing template. For example, if there was a smudge on the current page that made one value illegible, you have the chance to modify the guess for that piece of data or manually enter the value in the input box in the left sidebar. If a page is similar to an existing template, but has substantial changes, it is best to create a new template.
Create a Template
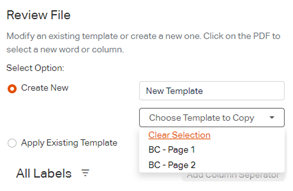
When creating a new template, you must specify all the data from the file. You do not have the option to manually change data because the template must be reusable from file to file. Select the Create New option and enter the template name in the input box. If you would like to start from an existing template, select the existing template in the Choose Template to Copy Dropdown.
Step 3: Confirm Project and Borehole Data
View Field Selections
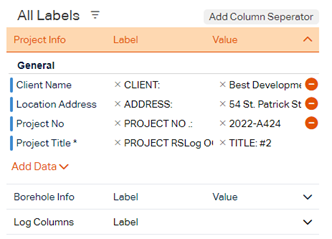
All RSLog project and borehole fields are available for identification in the log PDF. The list of fields is in the left sidebar under the Project Info and Borehole Info accordions. After the log bounds are selected you will see the label and value data that the program has guessed for specific fields. These guesses are made by RSLog’s AI tool and must be viewed and approved before creating a template. To view these guesses, you may: 1) Hover over the labels in the left sidebar to see the locations of field data on the PDF or 2) Hover over the words on the PDF to see the fields assigned to each word. On the PDF, label data is highlighted dark blue and value data is highlighted light blue. Unidentified words are highlighted in light orange. The yellow numbers on the PDF indicate that more than one field was selected for a given word. If a word is highlighted in red it indicates that both a label and value from a field was selected for that word and it is likely incorrect.
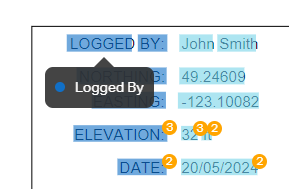
Edit the Field Selections
To remove incorrect field guesses you can either:
- Remove individual word guesses by clicking a highlighted word on the pdf and clicking Unassign in the modal.
- Hold down Shift + a and click multiple words. The top right corner will include a badge that says Select words to unassign to indicate that you are in unassign mode.
- Draw a box on the screen to highlight multiple words. If at least one word is selected by a field, then you have the option to unassign fields from all words. In the modal click Unassign.
- Clear the entire field selection by clicking the grey “x” button on the left sidebar.
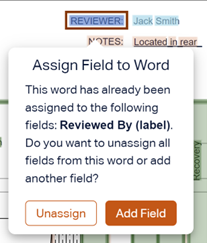
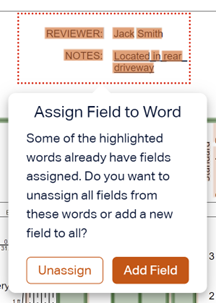

To select a word for a field, you can either:
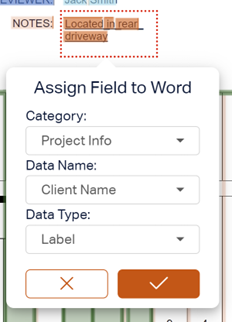
- Make individual word guesses by clicking a highlighted word on the pdf then selecting the category, data name, and data type for the word in the modal. If the word is already assigned to another field, click Add Field in the model, then select the word data.
- Hold down Shift and click multiple words. As you hold shift, the last selected word information will appear in the top right corner to indicate that you are multiselect mode.
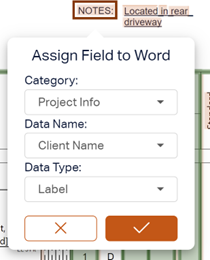

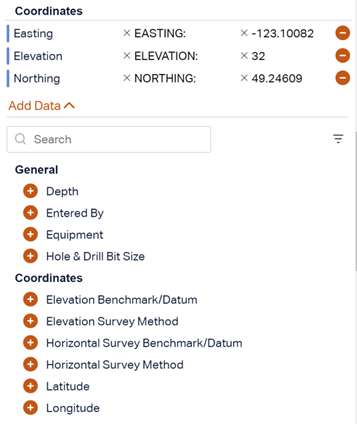
The left sidebar includes a filter button, so you can see all the available fields or the identified fields. If you select just the identified fields you can select which specific fields are present in the log and only view/interact with those fields. The minus circle button beside each field allows you to remove that field from view. To add more fields, click the Add Data button. You can view the remaining fields and add them to view with the add circle button.
New Project Data
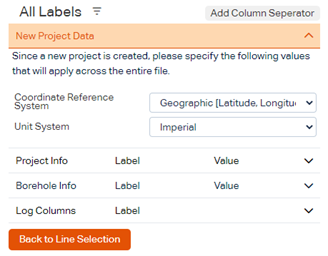
When you create a template, you also must specify some project data under the New Project Data accordion. This is specifically application if you selected “create a new project from the log data” when you uploaded the file. You must select the unit system and coordinate system, which will appear in every project that is created with this template.
Step 4: Confirm Log Column Data
View Field Selections
Most RSLog depth-dependent information is available for identification in the log PDF. The list of fields is in the left sidebar under the Log Info accordion. The log fields also have initial guesses made by RSLog’s AI tool. For each column, both column header words and column line bounds need to be selected. To view the currently assigned columns, you may 1) Hover over the labels in the left sidebar to see the locations of columns on the PDF or 2) Hover over the columns on the PDF to see the fields assigned to each column. On the PDF, column data is highlighted in green, and the header word data is highlighted in a darker green.
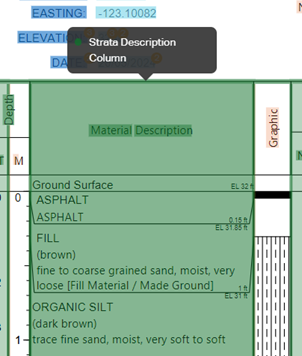
Edit Field Selections
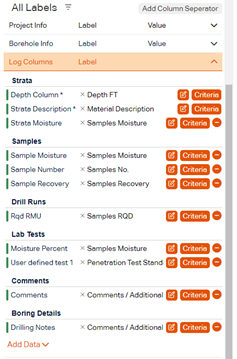
To remove incorrect field guesses you can either: 1) Remove individual column guesses by clicking a highlighted column on the pdf and clicking Unassign in the modal or 2) Clear the entire field selection by clicking the grey x button on the left sidebar.
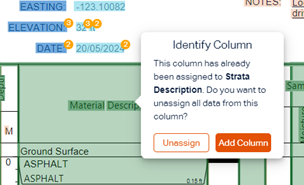
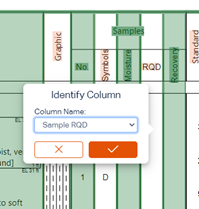
To select a column for a field, click the column on the PDF then select the column field from the dropdown.
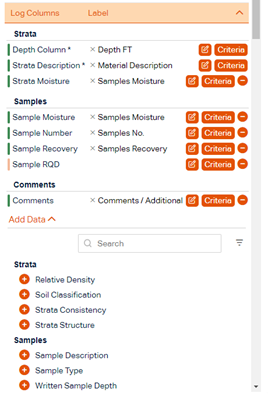
The left sidebar includes a filter button, so you can see all the available fields or the identified fields. If you select just the identified fields you can select which specific fields are present in the log and only view/interact with those fields. The minus circle button beside each field allows you to remove that field from view. To add more fields, click the Add Data button. You can view the remaining fields and add them to view with the add circle button.
Column Criteria
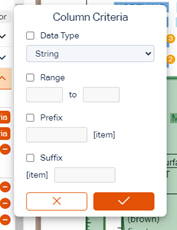
Many different log templates include columns that contain more than one type of field. For example, some columns include values for both elevation and depth. The OCR tool includes column criteria for these cases so you can specify the exact data to extract from each column. There are two buttons in the left sidebar beside each log field to specify this criteria: the header word edit button and the Criteria button. Firstly, the Criteria button opens a popup that allows you to restrict the type of data extracted from the column. There are currently four options for restrictions: 1) Data type, 2) Range, 3) Prefix, 4) Suffix.
- Data Type: The data type dropdown allows you to specify what type of data is extracted: number or string. By selecting one or the other, you are extracting only that type of data from the column. For example, if a column includes both sample number (which is a number) and sample type (which is a string), you may select the same column for both fields and add criteria specifying each as string or number.
- Range: The range allows you to specify a specific numerical range in which to accept data from. For example, if a column has both depth and elevation where depth ranges from 0-20 meters and elevation ranges from 200-300 meters, you can use the range to distinguish between the two.
- Prefix and suffix: Specifying the prefix and suffix allows you to extract only the data that contains the correct prefix and/or suffix. The extracted data in the borehole will not include the prefix and suffix words and only includes the data extracted from between them. For example, if one column contains both sample RQD and recovery in which the format of the column is “RQD = 15” and “Recovery = 13%”, you may use prefix and suffix to distinguish between the data and extract the numbers only. For RQD, you would enter “RQD =” as the prefix and for recovery you would enter “Recovery =” as the prefix and “%” as the suffix.

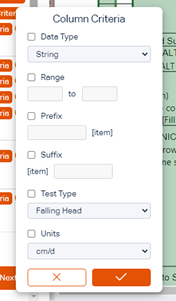
For specific lab test fields, there are two additional pieces of information available in the criteria popup: the test type and the units. The test type dropdown is available for the fields, hydraulic conductivity and friction angle, and refers to the RSLog fields hydraulic test type and triaxial test type respectively. The test type you select will be added to the lab test section alongside the lab test values that are extracted. The unit dropdown is available for the fields, hydraulic conductivity, vane shear peak value, vane shear remoulded value, dry density, cohesion, and pc. In the criteria popup, if you specify the units of these fields from the log, RSLog will convert the data from these units to the units used by RSLog.
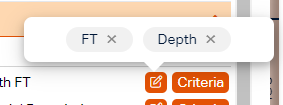
Finally, there is the option to edit the header words that are selected for each column. Simply click the edit button beside each log column and remove the words that are not applicable. The reason to specify the specific header words is that the column needs to be general and transferable across different files and pages. If there is a specific word in the header that is not the same page to page, it should be removed so the template successfully matches across pages.
Add Column Separator
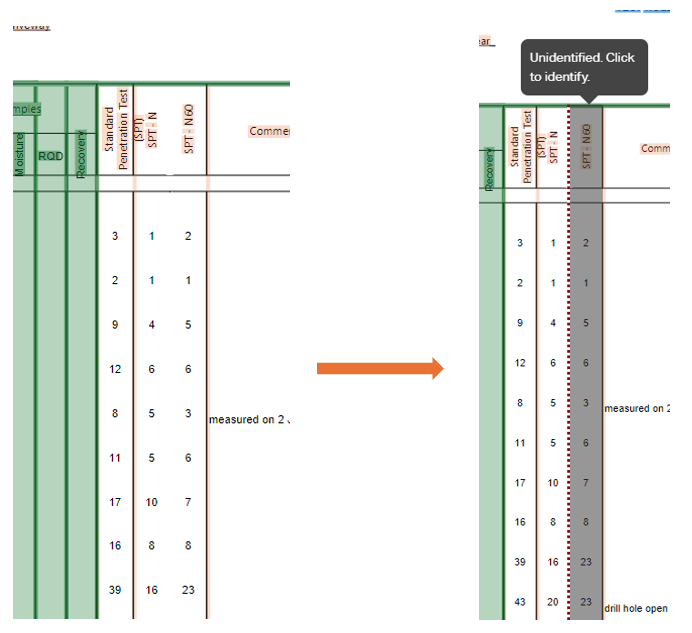
The final customizable aspect of log column selection is the Add Column Separator button. If there is a case where your log PDF does not include vertical lines to separate all the data, but instead uses vertical space as the separation (see example below), you have the option to draw your own vertical line. Once a vertical line is placed it will act like any other vertical column line and separate one column into two.
By pressing Add Column Separator, a dotted vertical line will be placed on the PDF. Simply move the line where you want it to be placed and click. If you want to edit the placement of a line, click, drag, and release the line where you want it. Once you place a line any column field selection will be deleted that has 1) Used the line in the past or 2) Is now interfering with the line. After the line is placed it can be used to select a column. To delete a line simply double-click on the line.
Step 5: Move to the Next Page
Once you are finished creating a template or applying an existing template, click Save to save the template and stay on the same page or Save and Next to save the template and move to the next page missing a template. The following fields are required and must be filled out before saving: borehole ID, depth column, and strata description column. When you are editing the final missing page, click Finish
to save the current page you are on and close the PDF editor. At this stage the template is fully assigned and ready to create boreholes.
Extract Boreholes from Logs
Once a file has the status Templates Matched, you will have the option to extract the boreholes. You can either extract boreholes file by file or extract them all at once. Once you click the Create Boreholes Icon button the file status will change to Extraction in Progress. When the extraction is complete, the status will change to Complete, and you will receive a notification.
You can only extract the boreholes once per file, so make sure you review the file pages to ensure that the correct information is selected. If there is an error in the extraction, you will see the issue in the notification and you must correct the error before extracting again.
OCR History
Once you have completed the borehole extraction, a link to the new borehole along with the corresponding RSLog project and log PDF will appear in the OCR History section of the page.

OCR Projects
Projects that include boreholes created by the OCR tool will include the OCR tag. The specific boreholes created will include a button linking to the log PDF so you are able to view the new borehole alongside the log. The new boreholes will also have access to all RSLog features including the GIS map, cross-section designer, and borehole log generator.

