20 - Lateral Pile Analysis Optimization
1.0 Introduction
In this tutorial, we will analyze the lateral deflection of reinforced concrete piles of varying diameters under lateral loading conditions. We will compare results for piles with a 50mm steel casing against results for piles with steel rebar reinforcement and determine the optimal pile diameter to limit deflection within an allowable threshold of 1% of Pile Diameter for each configuration.
This script automates the process using RSPile Scripting, allowing us to iterate over multiple pile diameters efficiently.
2.0 Open Rocscript Editior
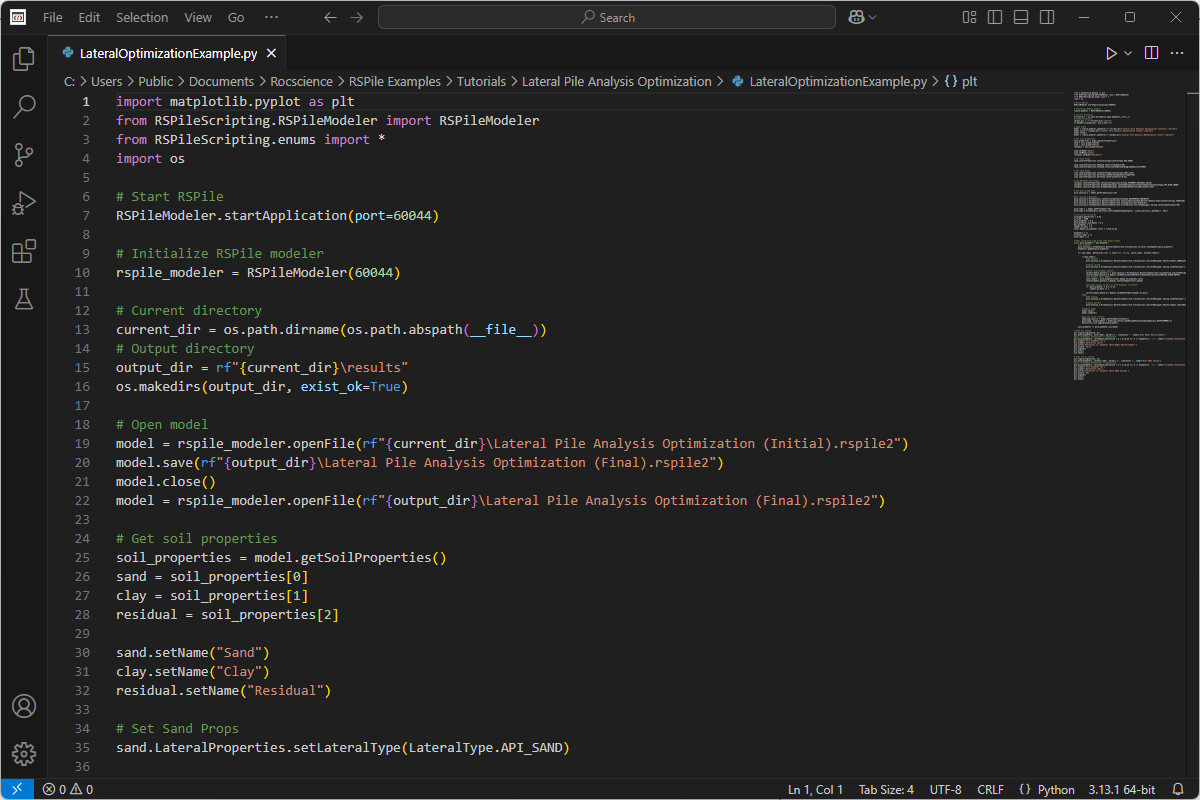
Launch the RocScript Editor and open the lateral_pile_analysis_optimization.py python file.
- Open the RSPile program.
- Select Scripting > Launch RocScript Editor
 from the menu. The RocScript Editor (VSCodium) will be launched.
 - In the RocScript Editor, select File > Open File, and select folder C:\Users\Public\Documents\Rocscience\RSPile Examples\Tutorials\Tutorial 20 - Lateral Pile Analysis Optimization.
- Open the lateral_pile_analysis_optimization.py file. The file will be displayed as shown below.
2.1 Install Libraries
The RSPile Python API Library is required for RSPile Scripting. In this tutorial, we will also use two additional popular Python libraries:
- Pandas – for data structuring and analysis
- Matplotlib – for graphing data.
All three libraries come pre-installed with the RocScript Editor. No manual installation is needed.
Advanced Users
For advanced users who are using their own python environment, you will need to install required libraries manually.
- Run the following command in your own terminal or command prompt:
Pip install -r requirements.txtThe requirements.txt file lists out the above-mentioned libraries. The file can be found in the tutorial folder.
3.0 Starting the Script
3.1 Import Required Modules
To start, we import the required modules from the RSPile API Library and the matplotlib library.
import matplotlib.pyplot as plt
from RSPileScripting.RSPileModeler import RSPileModeler
from RSPileScripting.enums import *
import os
3.2 Start the RSPile Application
The RSPile application is opened and an instance of the modeler is created.
RSPileModeler.startApplication(port=60044)
rspile_modeler = RSPileModeler(60044)
Here, we start RSPile on the default RSPile Scripting port 60044 and create a modeler instance to interact with the application.
3.3 Set Up Directories
The current directory is defined and an output directory is created to store results.
current_dir = os.path.dirname(os.path.abspath(__file__))
output_dir = rf"{current_dir}\results"
os.makedirs(output_dir, exist_ok=True)
3.4 Load the Tutorial Model
The script opens the initial RSPile model for further modifications.
model = rspile_modeler.openFile(rf"{current_dir}\Lateral Pile Analysis Optimization (Initial).rspile2")
model.save(rf"{output_dir}\Lateral Pile Analysis Optimization (Final).rspile2")
model.close()
model = rspile_modeler.openFile(rf"{output_dir}\Lateral Pile Analysis Optimization (Final).rspile2")
3.5 Define Soil Properties
The model contains three types of soil: Sand, Clay, and Residual Soil.
- The soil properties are defined as follows:
- Sand Properties
- Clay Properties
- Residual Soil Properties
soil_properties = model.getSoilProperties()
sand = soil_properties[0]
clay = soil_properties[1]
residual = soil_properties[2]
Setting Soil Names
sand.setName("Sand")
clay.setName("Clay")
residual.setName("Residual")sand.LateralProperties.setLateralType(LateralType.API_SAND)
sand.LateralProperties.APISand.setFrictionAngle(30)
sand.LateralProperties.APISand.setInitialModulusOfSubgradeReaction(5000)clay.LateralProperties.setLateralType(LateralType.SOFT_CLAY)
clay.LateralProperties.SoftClay.setUndrainedShearStrength(50)
clay.LateralProperties.SoftClay.setStrainFactor(0.02)residual.LateralProperties.setLateralType(LateralType.PIEDMONT_RESIDUAL_SOILS)
residual.LateralProperties.PiedmontResidual.setPiedmontAnalysisType(PiedmontTestValueType.SPT_BLOW_COUNT)
residual.LateralProperties.PiedmontResidual.setStandardPenetrationBlowCount(100)3.6 Define Pile Section Properties
- The first Pile Section is obtained.
- The Pile Section properties are set.
pile_section_1 = model.getPileSections()[0]pile_section_1.PileAnalysis.setSectionType(SectionType.REINFORCED_CONCRETE)
pile_section_1.PileAnalysis.ReinforcedConcrete.setCrossSectionType(ReinforcedConcreteCrossSectionType.CIRCULAR)
pile_section_1.PileAnalysis.ReinforcedConcrete.setCompressiveStrength(32)
pile_section_1.PileAnalysis.ReinforcedConcrete.CrossSection.ConcreteDesigner.Casing.setCasingThickness(50)3.7 Define Pile Type
- The first Pile Type is obtained.
- Pile Type 1 is set to be composed of a single 20m segment of Pile Section 1. The pile head is set to 1m above ground surface.
pile_type_1 = model.getPileTypes()[0]pile_type_1.PileAnalysis.Sections.setPileSegmentsByLength(1, [[pile_section_1.getName(), 20]])3.8 Run the Optimization Loop
- The variables are defined and iterate over different pile diameters, computing deflections.
- The While Loop is started.
- We will run two different analyses in the For loop. In one iteration we will have steel rebar reinforcement but no casing, and one where we have casing but no steel rebar reinforcement.
- The Rebar Cover Depth is set as a function of pile diameter.
- The Number of Rebar is set as a function of pile diameter.
- Compute or model for the iteration.
- Store results in correct list.
- Increment Pile Diameter
# Initialize variables
allowable_deflection = 0.01
m_to_mm = 1000
pile_diameter = 0.6
pile_diameter_increment = 0.2
max_diameter = 1.6
number_of_bars = 5
cover_depth_to_diameter_ratio = 1/5*m_to_mm
diameters = []
without_rebar = []
with_rebar = []while pile_diameter < max_diameter:
#set diameter
pile_section_1.PileAnalysis.ReinforcedConcrete.CrossSection.Circular.setDiameter(pile_diameter)
diameters.append(pile_diameter) for has_rebar, deflection_list in zip([True, False], [with_rebar, without_rebar]):
if(has_rebar):
pile_section_1.PileAnalysis.ReinforcedConcrete.CrossSection.ConcreteDesigner.Reinforcement.addReinforcementPattern("test pattern")
pile_section_1.PileAnalysis.ReinforcedConcrete.CrossSection.ConcreteDesigner.Casing.setUseCasing(False)
#setup reinforcement pattern
reinforcement_pattern_1 = pile_section_1.PileAnalysis.ReinforcedConcrete.CrossSection.ConcreteDesigner.Reinforcement.getReinforcementPatterns()[0]
reinforcement_pattern_1.Radial.setRebarLocationRefPoint(RebarReferencePointMethod.COVER_DEPTH) cover_depth = pile_diameter*cover_depth_to_diameter_ratio
reinforcement_pattern_1.Radial.setCoverDepth(cover_depth) if (pile_diameter % 0.4 == 0):
number_of_bars += 1
reinforcement_pattern_1.Radial.setNumberOfBars(number_of_bars)
else: pile_section_1.PileAnalysis.ReinforcedConcrete.CrossSection.ConcreteDesigner.Casing.setUseCasing(True)
pile_section_1.PileAnalysis.ReinforcedConcrete.CrossSection.ConcreteDesigner.Reinforcement.removeReinforcementPattern("test pattern") model.save()
model.compute()modeling_results = model.getPileResultsTables()
pile_name, displacement = modeling_results.getMaximumValue(GraphingOptions.DISPLACEMENT_X)
deflection_list.append(displacement) pile_diameter += pile_diameter_increment3.9 Visualizing Results
Plot deflection results with and without casing.
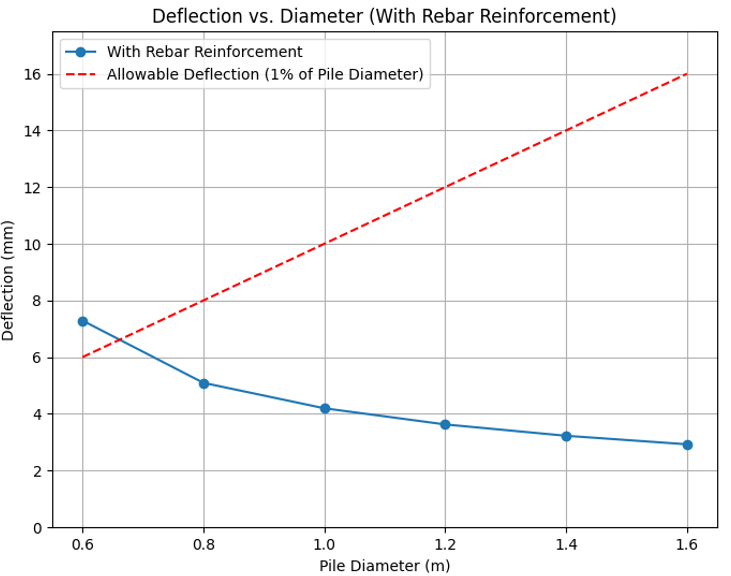
- Plot the width of Pile Diameters with Rebar
# Plot for casing
plt.figure(figsize=(8, 6))
plt.plot(diameters, with_rebar, marker='o', linestyle='-', label='With Rebar Reinforcement')
#plot "allowable deflection" vs deflection
plt.plot(diameters, [allowable_deflection * d * m_to_mm for d in diameters], 'r--', label='Allowable Deflection (1% of Pile Diameter)')
plt.xlabel('Pile Diameter (m)')
plt.ylabel('Deflection (mm)')
plt.title('Deflection vs. Diameter (With Rebar Reinforcement)')
plt.ylim(0, 17.5)
plt.legend()
plt.grid()
plt.show()
The diagram will look as follows:
- Save a copy of the figure and then close the figure dialog.
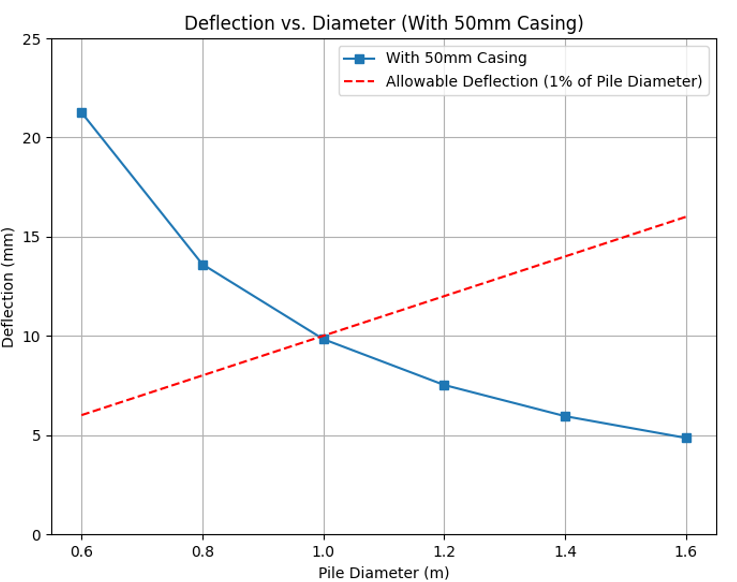
- We then plot the width of Pile Diameters without 50mm Casing
plt.figure(figsize=(8, 6))
plt.plot(diameters, without_rebar, marker='s', linestyle='-', label='With 50mm Casing')
#plot "allowable deflection" vs deflection
plt.plot(diameters, [allowable_deflection * d * m_to_mm for d in diameters], 'r--', label='Allowable Deflection (1% of Pile Diameter)')
plt.xlabel('Pile Diameter (m)')
plt.ylabel('Deflection (mm)')
plt.title('Deflection vs. Diameter (With 50mm Casing)')
plt.ylim(0, 25)
plt.legend()
plt.grid()
plt.show()
The diagram will look as follows:
4.0 Conclusion
This tutorial demonstrates pile diameter optimization using RSPile scripting. By systematically varying pile diameters and reinforcement settings, we evaluate their effect on deflection, helping to optimize lateral pile designs.