Add/Edit/Delete Layout
With the Add Reinforcement Layout dialog, users can assign reinforcements to one or all wall segments by defining a uniform or custom layout.
Add Layout
To add a layout:
- Select Loading and Support > Reinforcement > Add Layout

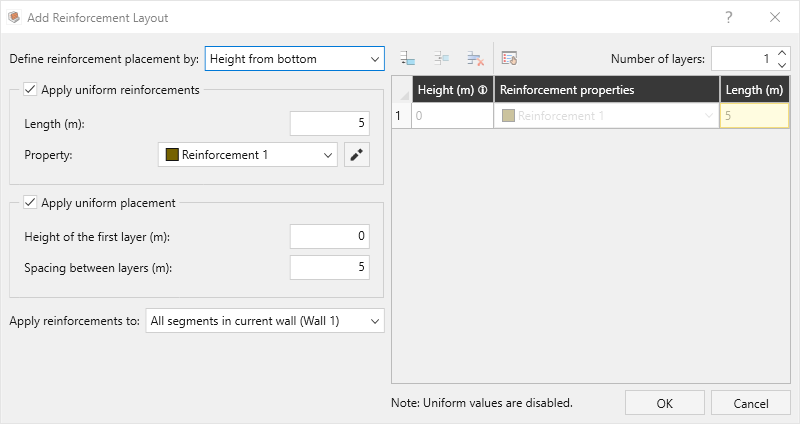
Define reinforcement placement by
- Wall course: allows you to specify how many courses are directly below each reinforcement layer in the table. It will be located directly on the block interface.
- Elevation: allows you to specify the elevation of each reinforcement layer. If the reinforcement layer elevation does not coincide with a block interface, then it will be placed behind the block at the specified elevation, and internal sliding will be skipped for this layer.
- Height from bottom: allows you to specify the height of each reinforcement layer above the bottom of the wall section. If the resulting reinforcement layer elevation does not coincide with a block interface, then it will be placed behind the block at the specified elevation, and internal sliding will be skipped for this layer.
Apply Uniform Reinforcements
When this option is selected, all the reinforcements in this layout will have the same length and property.
Apply Uniform Placement
This options allows you to place the reinforcements at regular layer intervals (e.g. every third block layer above the first layer).
- You can specify which block course the first layer rests on top of using Number of courses below first layer
- You can specify the number of block courses between adjacent layers using Number of courses between layers
Custom Layout
If you wish to specify different lengths or properties of reinforcements on a single wall section, you can use the table option.
In this option, you can fill in a table whereby each row corresponds to a single reinforcement layer and you can define its location, length and properties in the table. How the location is defined is based on your selection in the Define reinforcement placement by drop down.
Apply to
- All segments in the current wall
- Current segment only
Use this option to control whether the current section is applied to just the current wall segment or all wall segments in the current wall.
Edit Layout
To make changes to a layout after defining it:
- Select Loading and Support > Reinforcements > Edit Layout

If a user wishes to replace the current layout with a new one, they can click Add Layout again.
Delete Layout
To remove the reinforcements from a wall segment:
- Select Loading and Support> Reinforcements > Delete Layout
 and click the drop down arrow.
 - Select either Delete from Current Segment or Delete from All Segments.